Showing posts with label arts and crafts. Show all posts

Thursday, October 2, 2014

How to Make a Cutesy Halloween Spider: A Beginner Sewing Craft

I've got a fun little treat for you today. How cute is this little spider?

Most people that know me in real life also know that I have an extremely talented mother. She can sew as well as any professional seamstress. I, on the other hand, did not gain her talent with thread and fabric. I can do basic to intermediate projects, but I still have a long way to go.

This project is great for a beginner sewer. My mom started at age 5, but I think 7 or 8 is a more common age to start these days.
 You'll need: 1 sheet of felt, ribbon, needle, thread, stuffing, scissors tacky glue, and googly eyes. Optional extras include pom poms and additional colors of felt. Assuming you have the scissors already, this project should cost less than $10 and will have extra of most items for future projects.
 To start: fold the sheet of felt over and cut out and oval. This will give you two ovals.
 Cut 8 equal pieces of ribbon.
 Fold the ribbon in half and secure together with tacky glue. While you're at it, space out the legs to your liking then flip them so the folded side is pointed toward the center. Secure with a small dot of glue if necessary.
 Place the second piece of felt on top to sandwich the ribbon and sew around the edges, leaving a gap in the stitching to turn it right side out and stuff it. You can use any type of stitch you want.
Turn the spider right side out and stuff with stuffing to desired plushness.
 Use a whip or ladder stitch to close the the hole in the stuffing and you're ready to decorate. For a video tutorial of a ladder stitch, click here. And for the whip stitch, click here.
 Have fun decorating. Add eyes, fangs, spots, and/or stripes. Tacky glue will easily attach just about anything to your spider.

This craft is part of a bigger party put together by Felt With Love Designs, so please feel free to check out the others:

Friday, September 5, 2014

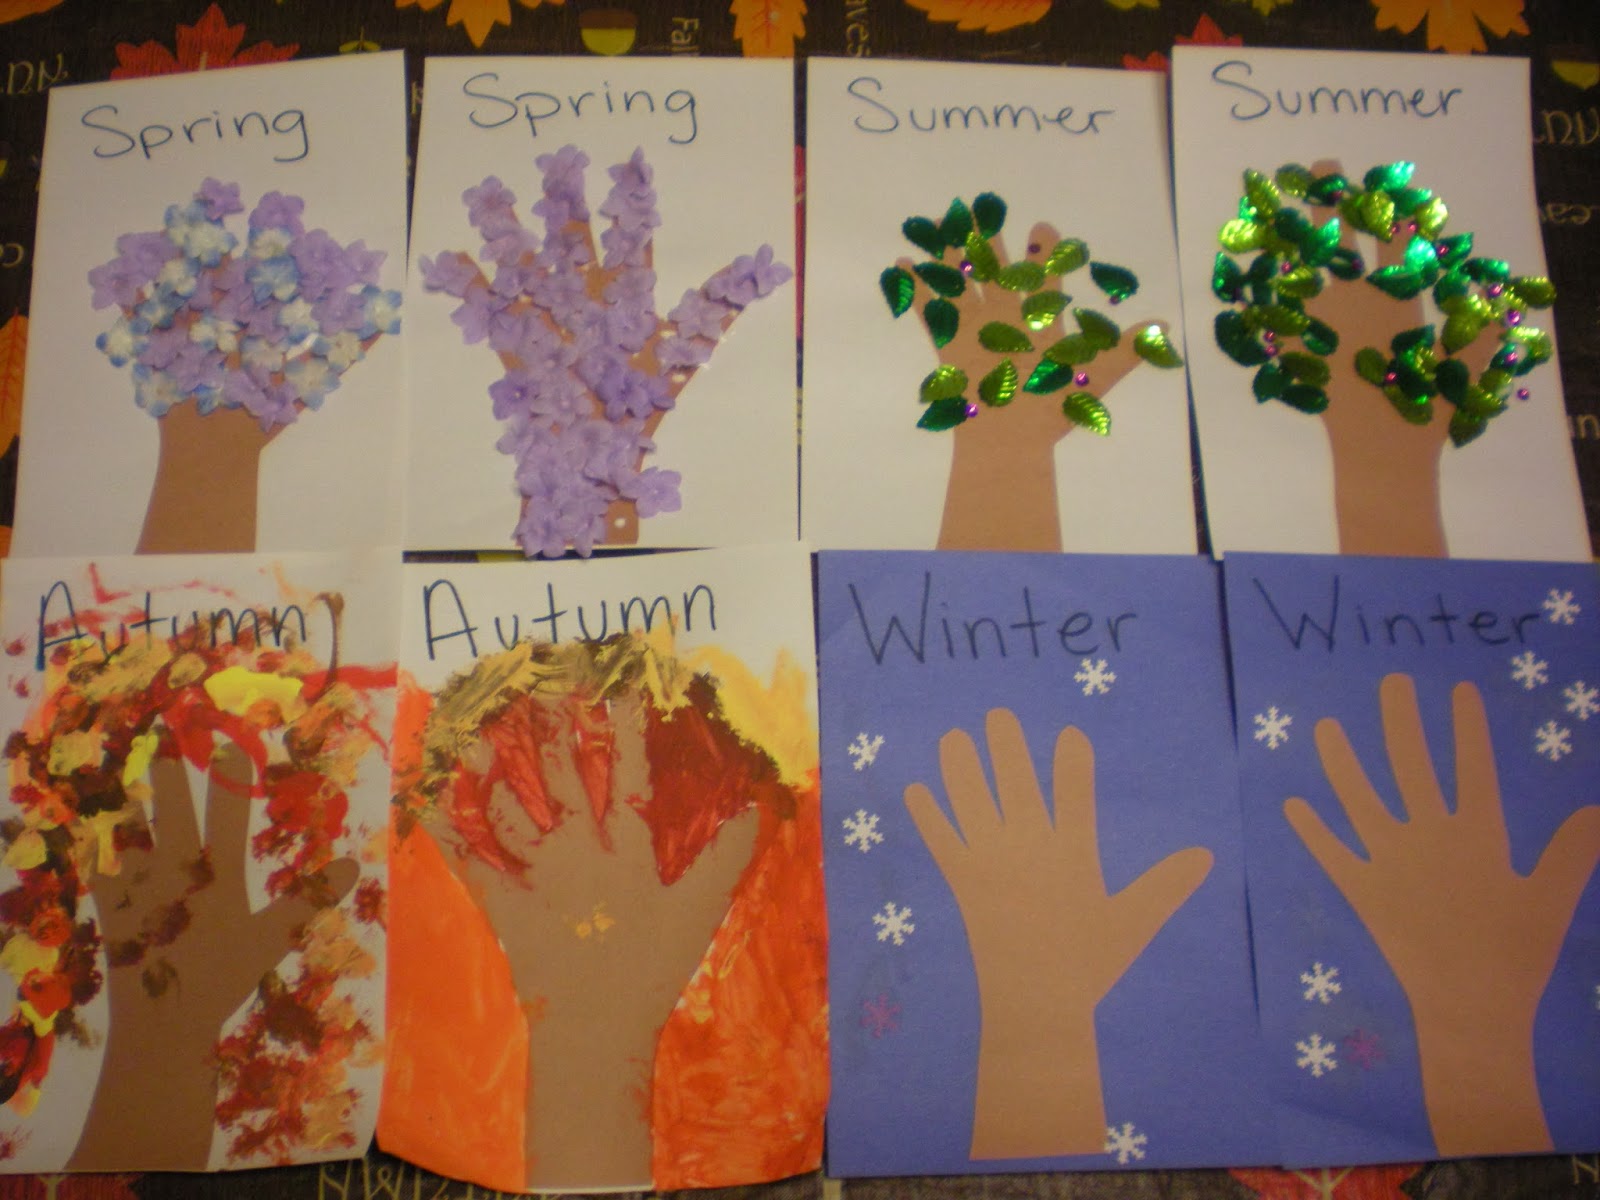
Seasonal Hand Trees -kid art

The change in seasons is not getting along with my sinuses, so I'm a little under under the weather. No pun intended, that's just how I talk. As a result, it completely slipped my mind that I needed to finish working on my homesteading post last night. Oops. Sleep made it much worse, so I just don't have the clarity of thought to write a new quality post. I decided to pull a post from the archives of my old blog to share today instead. I hope you enjoy.

We had an early snowfall at the beginning of the week. The leaves hadn't all changed colors and fallen from the trees! I was planning to do the autumn version of this project anyway, so we ran with it and talked about all the seasons. The little hands are all Quinn's (3) projects and the larger hands are all  Zeke's (4). For this set, I did most of the prep work, but simply handed them the supplies to decorate the trees (one season at a time) and watched to see what they did.
We made an almost special trip to the craft store to search for things to decorate our spring and summer trees. I lucked out and found these and other supplies on sale and clearance.

If you have any questions pertaining to the projects shown, please ask in the comment section or send me an email and I'll get back to you within a few days.

Wednesday, July 30, 2014

Creative Video Workshops on Creativebug #GetCreative

I was recently given the opportunity to review creativebug.com's creative video workshops. I was previously unfamiliar with the website, so I did a little bit of searching and found they have quite the assortment of videos, over 40 of which are free. They have a variety of categories including, but not limited to: sewing, paper, yarn, quilting, jewelry, and kid crafts.
The awesome thing about this site is that if you randomly decide you want to learn how to crochet or do some other project at midnight, you totally can. The instructors are very knowledgeable and easy to learn from. It's almost felt like they were right there in my house showing me how to do things, because they anticipated questions and showed things from the angles you need to see.
I had a great time exploring various videos. I learned a ton! It really got my creative juices flowing. I came up with so many other applications while I was watching the videos and now have a ton of projects I want to do.
Some classes I enjoyed, but haven't made anything from...yet:
I eventually had to stop exploring workshops, because my list was getting too long, but they have so many workshops on just about any crafty thing you could want. They even have sections for weddings and entertainment!

I did have the chance to make a project from Image Transfers. This is so cool and you probably have the supplies to try at least part of this in your home right now. It shows you how to do packing tape transfers, gel medium transfers, solvent based transfers, and acrylic paint transfers.
So, my kids discovered Pokemon this summer and Quinn adores Pikachu, she even wanted a Pikachu cake for her birthday. The morning after I watched this workshop, I thought, I'll make her a sturdy picture she can play with. Showing her the process was a bad idea, because she thought I was ruining the picture by putting it face down on the paint. I ended up drawing her another picture and when I finished the transfer later, she carried them both around for the longest time. She didn't even care that I didn't do a perfect job.

screenshot from Quilt Making 101: Patchwork

I've also started work on a quilt! I've wanted to make one for awhile now, but these workshops and this review gave me the motivation to pull out my sewing machine. They have several quilting workshops, but I looked at Quilt Making 101: Patchwork to get started. It will be awhile before I'm all finished, because I'm still collecting fabric and I may or may not have broken my sewing machine while working on the first block. To keep costs down as much as possible, I'm using old worn out clothing and fabric scraps for as much of the quilt as I can. Here's what I have done so far. The fabric is from a pair of shorts and a dress that  got holes in them.

Creativebug.com is offering a 14-day free trial to new users if you're interested. The cost is fairly reasonable it's $9.95 a month for unlimited access to their over 300 videos or you can buy individual classes. Click here for more information. If you're looking to give this as a gift, they have gift subscriptions too! Their best deal is a year long subscription for $50.

If you have any more questions, check out their FAQ page here.

What will you make today?

Disclaimer: I received one or more of the products mentioned above for free using Tomoson.com. Regardless, I only recommend products or services I use personally and believe will be good for my readers.
Related Posts Plugin for WordPress, Blogger...